Unbricking a $2,000 Bike With a $10 Raspberry Pi
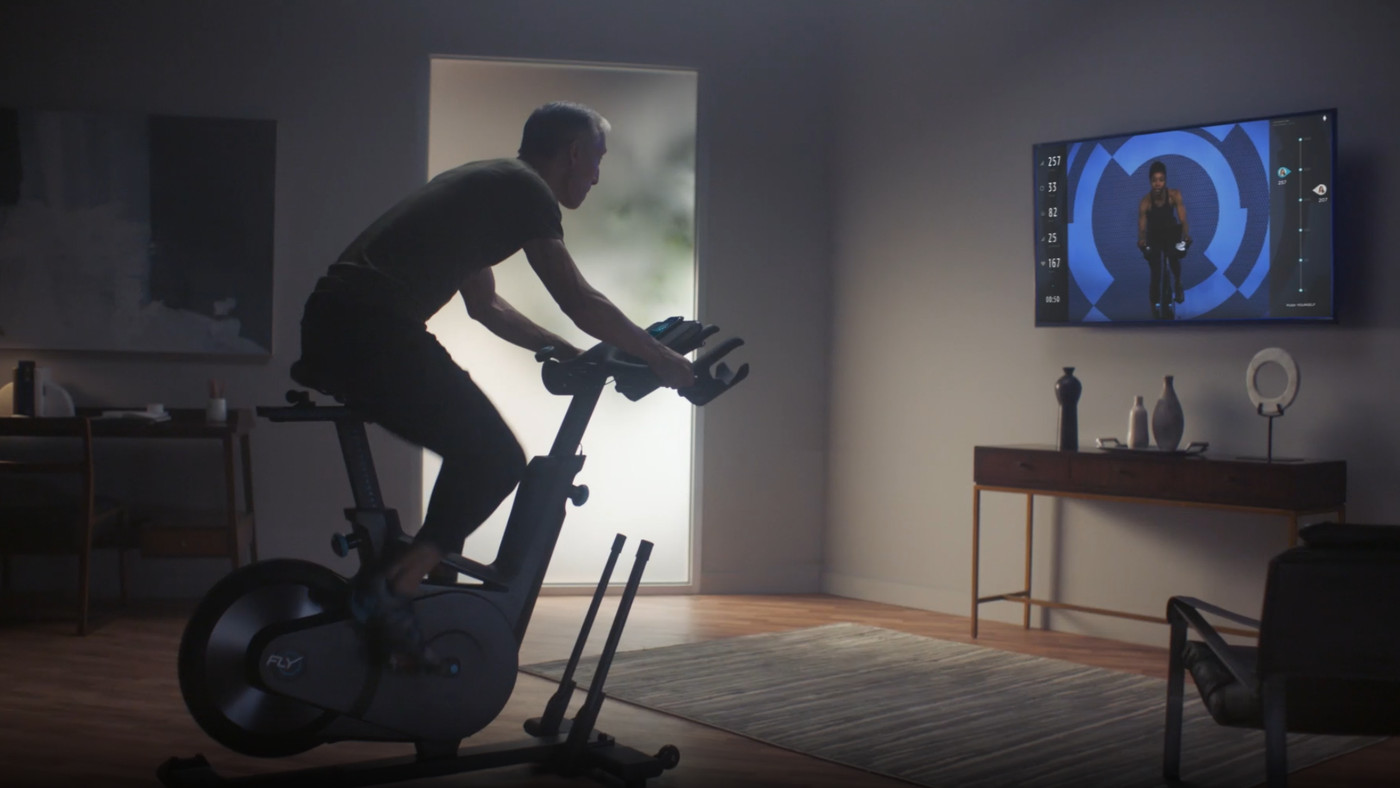
The Flywheel Home Bike. Image: Flywheel Sports.
A few years ago I splurged on an exercise bike. It’s a pretty expensive item imho, both in upfront and ongoing subscription costs. But I was able to justify it by riding it all the time so that per-ride it wasn’t that expensive. I’m happy to say this was a huge boon for my fitness and it was worth every penny.
The bike is the Flywheel Home Bike by Flywheel Sports. You open up the app, pick a class, and start riding. The app shows you a live video stream of an instructor, your position on the leaderboard so you can compete with the other people in the class, and your realtime stats like power (watts) and cadence (rpm). There’s all the usual motivational badges that come with fitness apps these days, and each ride is logged so you can track your progress over time.
Or, that’s how it used to work anyway.
Flywheel recently and abruptly shut down the Home Bike service following a legal battle with their competitor, Peloton. The bike does still work in that you can still pedal and adjust the resistance and technically get a workout. But the app is no longer so there are no classes, no competition, and no stats.
Flywheel customers left wanting a bit more had a few options:
- Swap it for a free refurbished Peloton. Join Peloton for the same monthly fee and take their classes instead. Not a bad deal and arguably an upgrade.
- Use the free LifeFitness ICG Training App. The Flywheel Home Bike is a rebranded LifeFitness IC5 so it just happens to work with this app. This gives you live stats like power and cadence and the ability to track your progress but doesn’t provide any live classes or competition, nor is it officially supported.
- Add a set of power meter pedals ($). Use the bike with the massively-multiplayer online cycling simulator Zwift and other training apps.
- Reverse engineer the bike. Set its data free to be used with Zwift and other training apps. No power meter pedals required.
The rest of the post is a walk-through of my experience writing some code that enables the Flywheel Home Bike to work with Zwift and other training apps. It likely also works for the LifeFitness IC5 and support for other bikes should be easy to add.
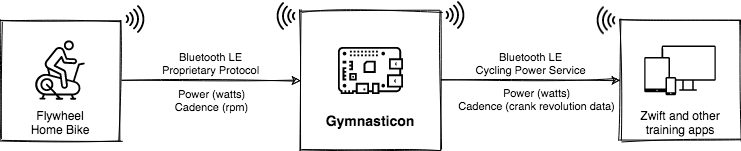
The finished program is called Gymnasticon and the code is open-source on GitHub.
Project goals
The primary goal is to make the Flywheel Home Bike work with Zwift. It would be great if it also works with other cycling apps like TrainerRoad and Rouvy.
The solution should be easy to use for a non-developer and non-destructive to the bike.
The plan to get there is broken down into 3 parts:
- Write some code to get power and cadence data out of the bike’s proprietary protocol
- Write some code to send power and cadence data to Zwift emulating a Bluetooth bike
- Put the two together into a final working solution
Part 1 - Getting data out of the bike

Only two pieces of information are needed to make a bike work with Zwift: power (watts) and cadence (rpm). Power enables Zwift to calculate your speed and position in the game. Cadence improves the experience of cadence-based workouts and enables Zwift to accurately animate your character.
We know from experience that this bike is capable of producing that information and that it communicates with the official Flywheel app using Bluetooth so the first step is to open up a Bluetooth service explorer and see what’s available.
Bluetility on macOS shows the services offered by the Flywheel Home Bike.
The bike advertises a single service with two characteristics (aka data values). A web search for the service UUID tells us this is Nordic UART Service which is a custom service defined by Nordic Semiconductor. It allows sending arbitrary data back and forth, emulating a serial port.
The characteristics are named from the bike’s perspective. To transmit data to the bike we write to the receive (RX) characteristic. To receive data from the bike we subscribe to the transmit (TX) characteristic.
Clicking subscribe on the (TX) characteristic shows that the bike is already sending some data. It is a bit hard to see the data here though. The short JavaScript program below uses the noble Bluetooth client library to connect to the bike and dump all the received data to the console so we can begin to analyze it.
/**
 * Connect to the Flywheel Home Bike's Bluetooth UART service and log
 * received data to the console.
 */

import noble from '@abandonware/noble';
import {on, once} from 'events';

(async () => {
  // nordic uart service and characteristics
  const uuid = '6e400001b5a3f393e0a9e50e24dcca9e';
  const rxUuid = '6e400002b5a3f393e0a9e50e24dcca9e';
  const txUuid = '6e400003b5a3f393e0a9e50e24dcca9e';

  // wait for adapter
  const [state] = await once(noble, 'stateChange');
  if (state !== 'poweredOn') {
    throw new Error(`bluetooth adapter state ${state}`);
  }

  // scan
  await noble.startScanningAsync([uuid], false);
  const [peripheral] = await once(noble, 'discover');
  await noble.stopScanningAsync();

  // connect
  await peripheral.connectAsync();
  const {characteristics: [tx, rx]} = await
      peripheral.discoverSomeServicesAndCharacteristicsAsync([uuid],
      [txUuid, rxUuid]);

  // start receiving
  await tx.subscribeAsync();
  const packets = on(tx, 'read');

  // exit on ctrl-c
  let exit = false;
  process.on('SIGINT', () => { exit = true; });

  // print all received data
  const start = new Date();
  for await (const [packet] of packets) {
    if (exit)
      break;

    const t = new Date() - start;
    const mm = `${Math.floor(t/60)}`.padStart(2, '0');
    const ss = `${t % 60}`.padStart(2, '0');
    const mmss = `${mm}:${ss}`;
    console.log(mmss, packet);
  }

  // stop receiving
  await tx.unsubscribeAsync();

  // disconnect
  await peripheral.disconnectAsync();
})();
Running the program, we get our first clear look at the data the bike is sending:
00:00 <Buffer ff 1f 0c 00 00 00 00 00 00 00 00 00 00 00 00 26 00 00 00 00>
00:00 <Buffer 00 00 00 00 00 00 00 0c 00 00 00 01 38 55>
00:01 <Buffer ff 1f 0c 00 00 00 00 00 00 00 00 00 00 00 00 26 00 00 00 00>
00:01 <Buffer 00 00 00 00 00 00 00 0c 00 00 00 01 38 55>
00:02 <Buffer ff 1f 0c 00 00 00 00 00 00 00 00 00 00 00 00 26 00 00 00 00>
00:02 <Buffer 00 00 00 00 00 00 00 0c 00 00 00 01 38 55>
00:03 <Buffer ff 1f 0c 00 00 00 00 00 00 00 00 00 00 00 00 26 00 00 00 00>
00:03 <Buffer 00 00 00 00 00 00 00 0c 00 00 00 01 38 55>
00:04 <Buffer ff 1f 0c 00 00 00 00 00 00 00 00 00 00 00 00 26 00 00 00 00>
00:04 <Buffer 00 00 00 00 00 00 00 0c 00 00 00 01 38 55>
Some initial observations on the data:
- The bike sends two packets of data every second.
- First packet is 20 bytes long, second is 14 bytes long.
Bluetooth LE 4.0 and 4.1 allow at most 20 bytes of application data per packet so this is likely a single 34-byte message sent in two chunks. A small change to the program joins the two chunks back together and adds a heading to make the output easier to read and reference.
Updated program output:
Offset         0  1  2  3  4  5  6  7  8  9 10 11 12 13 14 15 16 17 18 19 20 21 22 23 24 25 26 27 28 29 30 31 32 33

00:23 <Buffer ff 1f 0c 00 00 00 00 00 00 00 00 00 00 00 00 00 00 00 00 00 00 00 00 00 00 00 00 0c 00 00 00 01 1e 55>
00:24 <Buffer ff 1f 0c 00 00 00 00 00 00 00 00 00 00 00 00 00 00 00 00 00 00 00 00 00 00 00 00 0c 00 00 00 01 1e 55>
00:25 <Buffer ff 1f 0c 00 00 00 00 00 00 00 00 00 00 00 00 00 00 00 00 00 00 00 00 00 00 00 00 0c 00 00 00 01 1e 55>
00:26 <Buffer ff 1f 0c 00 00 00 00 00 00 00 00 00 00 00 00 00 00 00 00 00 00 00 00 00 00 00 00 0c 00 00 00 01 1e 55>
00:27 <Buffer ff 1f 0c 00 00 00 00 00 00 00 00 00 00 00 00 00 00 00 00 00 00 00 00 00 00 00 00 0c 00 00 00 01 1e 55>

(started pedaling)

00:28 <Buffer ff 1f 0c 00 00 00 00 00 00 00 00 00 31 00 00 00 00 00 00 00 00 00 00 00 00 00 00 0d 00 00 00 01 2e 55>
00:29 <Buffer ff 1f 0c 00 00 00 00 00 00 00 00 00 31 00 00 00 00 00 00 00 00 00 00 00 00 00 00 0e 00 00 00 01 2d 55>
00:30 <Buffer ff 1f 0c 00 21 00 14 00 00 00 00 04 58 00 95 00 00 00 00 00 00 00 00 00 00 00 00 0f 00 00 00 01 e1 55>
00:31 <Buffer ff 1f 0c 00 21 00 14 00 00 00 00 04 58 00 95 00 00 00 00 00 00 00 00 00 00 00 00 10 00 00 00 01 fe 55>
00:32 <Buffer ff 1f 0c 00 21 00 14 00 00 00 00 04 60 00 95 00 00 00 00 00 00 00 00 00 00 00 00 11 00 00 00 01 c7 55>
00:33 <Buffer ff 1f 0c 00 21 00 14 00 00 00 00 04 62 00 95 00 00 00 00 00 00 00 00 00 00 00 00 12 00 00 00 01 c6 55>
00:34 <Buffer ff 1f 0c 00 21 00 14 00 00 00 00 04 62 00 95 00 00 00 00 00 00 00 00 00 00 00 00 13 00 00 00 01 c7 55>
00:35 <Buffer ff 1f 0c 00 20 00 14 00 00 00 00 04 5e 00 93 00 00 00 00 00 00 00 00 00 00 00 00 14 00 00 00 01 fb 55>
00:36 <Buffer ff 1f 0c 00 1f 00 13 00 00 00 00 04 5e 00 90 00 00 00 00 00 00 00 00 00 00 00 00 15 00 01 00 01 c0 55>
00:37 <Buffer ff 1f 0c 00 1d 00 12 00 00 00 00 04 54 00 8c 00 00 00 00 00 00 00 00 00 00 00 00 16 00 01 00 01 d6 55>
00:38 <Buffer ff 1f 0c 00 1c 00 11 00 00 00 00 04 54 00 89 00 00 00 00 00 00 00 00 00 00 00 00 17 00 01 00 01 d0 55>
00:39 <Buffer ff 1f 0c 00 1c 00 11 00 00 00 00 04 4f 00 89 00 00 00 00 00 00 00 00 00 00 00 00 18 00 01 00 02 c7 55>
00:40 <Buffer ff 1f 0c 00 1c 00 11 00 00 00 00 04 4d 00 89 00 00 00 00 00 00 00 00 00 00 00 00 19 00 01 00 02 c4 55>
00:41 <Buffer ff 1f 0c 00 1b 00 11 00 00 00 00 04 4d 00 87 00 00 00 00 00 00 00 00 00 00 00 00 1a 00 01 00 02 ce 55>
00:42 <Buffer ff 1f 0c 00 1b 00 11 00 00 00 00 04 4b 00 87 00 00 00 00 00 00 00 00 00 00 00 00 1b 00 01 00 02 c9 55>
00:43 <Buffer ff 1f 0c 00 1a 00 10 00 00 00 00 03 4b 00 84 00 00 00 00 00 00 00 00 00 00 00 00 1c 00 01 00 02 ca 55>
00:44 <Buffer ff 1f 0c 00 19 00 0f 00 00 00 00 03 45 00 82 00 00 00 00 00 00 00 00 00 00 00 00 1d 00 01 00 02 df 55>
00:45 <Buffer ff 1f 0c 00 18 00 0f 00 00 00 00 03 45 00 7f 00 00 00 00 00 00 00 00 00 00 00 00 1e 00 01 00 02 20 55>
00:46 <Buffer ff 1f 0c 00 18 00 0f 00 00 00 00 03 43 00 7f 00 00 00 00 00 00 00 00 00 00 00 00 1f 00 01 00 02 27 55>
00:47 <Buffer ff 1f 0c 00 17 00 0e 00 00 00 00 03 3e 00 7d 00 00 00 00 00 00 00 00 00 00 00 00 20 00 01 00 02 69 55>
00:48 <Buffer ff 1f 0c 00 16 00 0e 00 00 00 00 03 3e 00 7a 00 00 00 00 00 00 00 00 00 00 00 00 21 00 01 00 02 6e 55>
00:49 <Buffer ff 1f 0c 00 15 00 0d 00 00 00 00 03 37 00 77 00 00 00 00 00 00 00 00 00 00 00 00 22 00 01 00 02 69 55>
00:50 <Buffer ff 1f 0c 00 15 00 0d 00 00 00 00 03 37 00 77 00 00 00 00 00 00 00 00 00 00 00 00 23 00 01 00 02 68 55>
00:51 <Buffer ff 1f 0c 00 16 00 0e 00 00 00 00 03 3c 00 7a 00 00 00 00 00 00 00 00 00 00 00 00 24 00 01 00 02 69 55>
00:52 <Buffer ff 1f 0c 00 16 00 0e 00 00 00 00 03 3c 00 7a 00 00 00 00 00 00 00 00 00 00 00 00 25 00 01 00 02 68 55>
00:53 <Buffer ff 1f 0c 00 17 00 0e 00 00 00 00 03 42 00 7d 00 00 00 00 00 00 00 00 00 00 00 00 26 00 01 00 02 13 55>
00:54 <Buffer ff 1f 0c 00 17 00 0e 00 00 00 00 03 42 00 7d 00 00 00 00 00 00 00 00 00 00 00 00 27 00 01 00 03 13 55>
00:55 <Buffer ff 1f 0c 00 17 00 0e 00 00 00 00 03 42 00 7d 00 00 00 00 00 00 00 00 00 00 00 00 28 00 01 00 03 1c 55>
00:56 <Buffer ff 1f 0c 00 17 00 0e 00 00 00 00 03 43 00 7d 00 00 00 00 00 00 00 00 00 00 00 00 29 00 01 00 03 1c 55>
00:57 <Buffer ff 1f 0c 00 17 00 0e 00 00 00 00 03 43 00 7d 00 00 00 00 00 00 00 00 00 00 00 00 2a 00 01 00 03 1f 55>
00:58 <Buffer ff 1f 0c 00 17 00 0e 00 00 00 00 03 43 00 7d 00 00 00 00 00 00 00 00 00 00 00 00 2b 00 01 00 03 1e 55>
Some more observations:
- When not pedaling, it’s almost all zeroes.
- Upon pedaling, a few of the zero values change – a promising sign.
- Some non-zero values (0, 1, 2, 33) remain constant.
- Some values (27, 29, 31) are increasing monotonically at different rates.
Power and cadence are hopefully some of those values that become non-zero upon pedaling.
Finding the cadence
Our approach here is to record some data while riding at a known steady cadence (60 rpm) for 30-60 seconds and then search for that value in the data. We can repeat this process at a couple different cadences to verify and clear up any coincidences.
This metronome came in handy for keeping a steady cadence.
The first few seconds of data:
Offset         0  1  2  3  4  5  6  7  8  9 10 11 12 13 14 15 16 17 18 19 20 21 22 23 24 25 26 27 28 29 30 31 32 33

00:00 <Buffer ff 1f 0c 00 00 00 00 00 00 00 00 00 00 00 00 35 00 00 00 00 00 00 00 00 00 00 02 d0 00 2c 00 5f 87 55>
00:01 <Buffer ff 1f 0c 00 00 00 00 00 00 00 00 00 00 00 00 2a 00 00 00 00 00 00 00 00 00 00 02 d0 00 2c 00 5f 98 55>
00:02 <Buffer ff 1f 0c 00 00 00 00 00 00 00 00 00 00 00 00 24 00 00 00 00 00 00 00 00 00 00 02 d0 00 2c 00 5f 96 55>
00:03 <Buffer ff 1f 0c 00 00 00 00 00 00 00 00 00 00 00 00 25 00 00 00 00 00 00 00 00 00 00 02 d0 00 2c 00 5f 97 55>
00:04 <Buffer ff 1f 0c 00 58 00 36 00 00 00 00 0c 35 00 f2 25 00 00 00 00 00 00 00 00 00 00 02 d1 00 2c 00 5f 33 55>
00:05 <Buffer ff 1f 0c 00 5a 00 38 00 00 00 00 0c 35 00 f5 25 00 00 00 00 00 00 00 00 00 00 02 d2 00 2c 00 5f 3b 55>
00:06 <Buffer ff 1f 0c 00 57 00 36 00 00 00 00 0c 49 00 f1 25 00 00 00 00 00 00 00 00 00 00 02 d3 00 2c 00 5f 41 55>
00:07 <Buffer ff 1f 0c 00 52 00 33 00 00 00 00 0b 49 00 ea 24 00 00 00 00 00 00 00 00 00 00 02 d4 00 2c 00 5f 5b 55>
00:08 <Buffer ff 1f 0c 00 4f 00 31 00 00 00 00 0b 40 00 e6 26 00 00 00 00 00 00 00 00 00 00 02 d5 00 2c 00 5f 42 55>
The recording begins and ends at standstill and otherwise should be approximately 60 rpm. Any offset with a max above 80rpm or below 50rpm or that doesn’t start and end with 0 is a non-match and can be discarded. We’re left with only two candidates:

It is clear from the chart that cadence is the uint8 at offset 12. A few extra tests at different cadences confirm this. There are non-zero values at offset 11 and 13 which confirms cadence is a uint8 and not the lower byte of a uint16.
This means the bike can report a maximum cadence of 255 rpm. What happens at 256 rpm? Does it wrap to 0 or clamp to 255? It turns out it’s pretty hard to pedal that fast and so this remains a mystery.
Finding the power
The exact same approach could work here: ride at a steady known wattage for 30-60 seconds and then look for that value in the data. However I don’t have a good way to know exactly what wattage I’m doing.
So this time we’ll keep a steady cadence and just keep adding resistance every few seconds. The data should show a series of plateaus each higher than the last. The absolute values should also be within a reasonble range starting out around 100 watts and staying well under 1000 watts.
We are most likely looking for a 16-bit integer this time and we’ll have to consider both big and little endian encodings.
The first few seconds of data:
Offset         0  1  2  3  4  5  6  7  8  9 10 11 12 13 14 15 16 17 18 19 20 21 22 23 24 25 26 27 28 29 30 31 32 33

00:00 <Buffer ff 1f 0c 00 00 00 00 00 00 00 00 00 00 00 00 2d 00 00 00 00 00 00 00 00 00 00 01 b2 00 12 00 25 ba 55>
00:01 <Buffer ff 1f 0c 00 00 00 00 00 00 00 00 00 00 00 00 2d 00 00 00 00 00 00 00 00 00 00 01 b2 00 12 00 25 ba 55>
00:02 <Buffer ff 1f 0c 00 00 00 00 00 00 00 00 00 28 00 00 2d 00 00 00 00 00 00 00 00 00 00 01 b3 00 12 00 25 93 55>
00:03 <Buffer ff 1f 0c 00 00 00 00 00 00 00 00 00 28 00 00 2d 00 00 00 00 00 00 00 00 00 00 01 b4 00 12 00 25 94 55>
00:04 <Buffer ff 1f 0c 00 00 00 00 00 00 00 00 00 25 00 00 2d 00 00 00 00 00 00 00 00 00 00 01 b5 00 12 00 25 98 55>
00:05 <Buffer ff 1f 0c 00 00 00 00 00 00 00 00 00 25 00 00 2d 00 00 00 00 00 00 00 00 00 00 01 b6 00 12 00 25 9b 55>
00:06 <Buffer ff 1f 0c 00 00 00 00 00 00 00 00 00 29 00 00 2d 00 00 00 00 00 00 00 00 00 00 01 b7 00 12 00 25 96 55>
00:07 <Buffer ff 1f 0c 00 56 00 35 00 00 00 00 0b 35 00 f0 2c 00 00 00 00 00 00 00 00 00 00 01 b8 00 12 00 25 1c 55>
00:08 <Buffer ff 1f 0c 00 5a 00 38 00 00 00 00 0c 35 00 f5 2d 00 00 00 00 00 00 00 00 00 00 01 b9 00 12 00 26 1c 55>
Any offset with a max below 100W or above 1000W, or that doesn’t start and end with 0 can be discarded. This time we’re left with three possibilities: offset 3, 5 and 13.
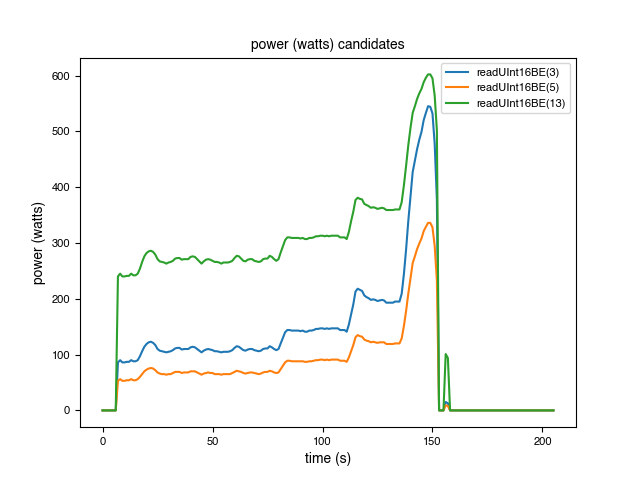
The absolute values suggest that offset 3 is the current power in watts. Based on my effort, offset 13 starts out too high and offset 5 doesn’t peak high enough.
So, what is the data at offset 5 and 13?
After some experimentation with the ICG Training App, I discovered that the bike has some hidden features not exposed by the Flywheel app. One of those features is that you can take a test to see the maximum power you can sustain over one hour of riding, known as Functional Threshold Power (FTP). The FTP result is stored on the bike and it reports your power as both watts (offset 3) and percentage of FTP (offset 5). The FTP% is frequently used in training programs. The default FTP stored in the bike appears to be 160 watts as when offset 3 ≈ 160, offset 5 ≈ 100.
The value at offset 13 is a very optimistic estimate of speed in km/h × 10. It could be that the rider weight defaults to 0.
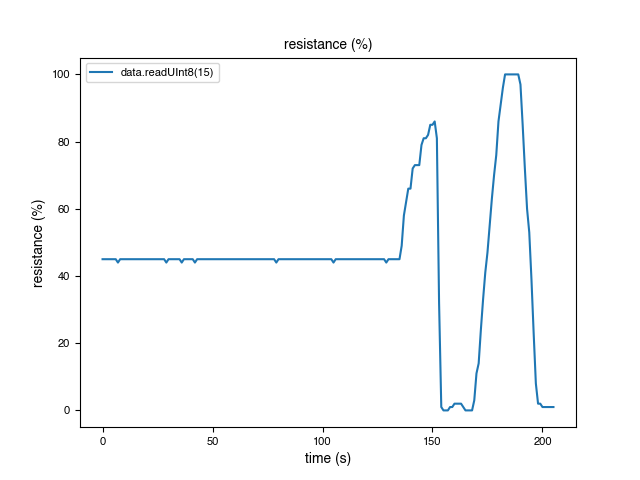
As a bonus, when I was recording data I noticed that offset 15 is the position of the resistance dial ranging from 0 (easy) to 100 (hard). This was easy to see in the program’s output when adjusting the resistance while not pedaling as it was one of the only values changing. It’s not necessary for making the bike work with Zwift.
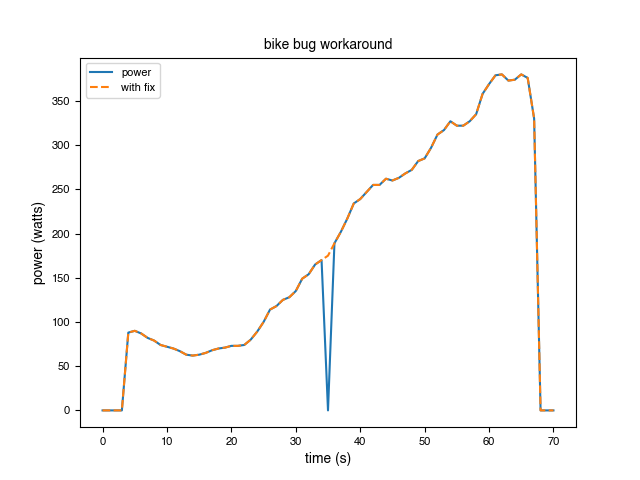
A bug in the bike?
Another thing I noticed during this testing is what appears to be a bug in the bike:
Offset 0 1 2 3 4 5 6 7 8 9 10 11 12 13 14 15 16 17 18 19 20 21 22 23 24 25 26 27 28 29 30 31 32 33
02:21 <Buffer ff 1f 0c 01 7b 00 ea 00 00 00 00 33 6c 01 f6 3a 00 00 00 00 00 00 00 00 00 00 00 7e 00 06 00 0e 67 55>
02:22 <Buffer ff 1f 0c 01 92 00 f8 00 00 00 00 36 6b 02 05 3b 00 00 00 00 00 00 00 00 00 00 00 7f 00 06 00 0e 6e 55>
02:23 <Buffer ff 1f 0c 01 96 00 fb 00 00 00 00 36 6b 02 08 3b 00 00 00 00 00 00 00 00 00 00 00 80 00 07 00 0f 9b 55>
02:24 <Buffer ff 1f 0c 00 00 00 00 00 00 00 00 00 6b 00 00 00 00 00 00 00 00 00 00 00 00 00 00 81 00 07 00 0f f1 55>
02:25 <Buffer ff 1f 0c 01 a2 01 02 00 00 00 00 38 6c 02 0f 3b 00 00 00 00 00 00 00 00 00 00 00 82 00 07 00 0f 5b 55>
02:26 <Buffer ff 1f 0c 01 97 00 fb 00 00 00 00 36 6c 02 08 3b 00 00 00 00 00 00 00 00 00 00 00 83 00 07 00 10 81 55>
| | |
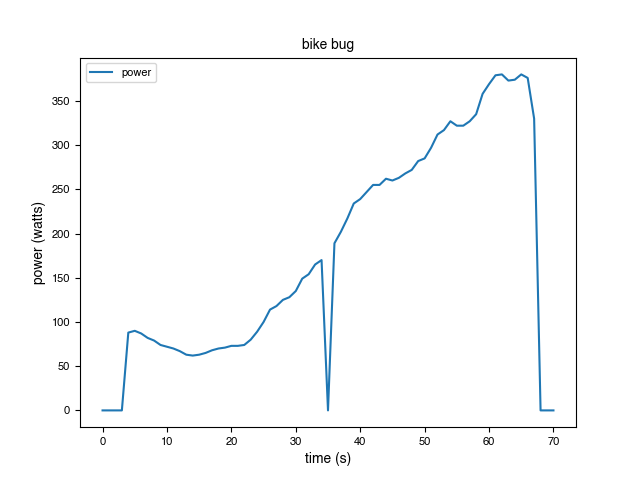
power cadence resistanceThe data at 2:24 shows a blip where power, resistance and some other values briefly drop to 0, while cadence is unaffected. Then at 2:25 they’re back. It turns out there are several instances of this throughout the data.
What this means is that you could be riding at a very high effort and all of a sudden your power drops to 0 for a second. Not the end of the world but it has the potential to be annoying. It seems to happen once every few minutes.
Flywheel doesn’t publish any details on how the bike works internally but the original manufacturer does hint at how power is calculated. From the LifeFitness IC5 page:
WattRate® Power Meter Displays a precise measurement of the user’s effort in watts. This precision is achieved by a positioning sensor that measures the resistance applied to the magnetic brake system.
So the bike doesn’t actually measure power like a power meter would. Instead, it maps the position of the magnetic brake to a point on some factory calibrated curve or lookup table.
One possible explanation then is that there’s a hardware problem with the positioning sensor or, perhaps more likely, a firmware bug causing resistance to occasionally incorrectly read 0. The power value is derived from the resistance reading and so it also ends up as 0.
A simple fix is to just use the previous power value if ever: the cadence is non-zero and the previous power is non-zero and the current power is zero. A slight improvement is to keep track of the slope and factor it in when calculating the predicted value. If the bug occurs during a fast acceleration or deceleration that should give a slightly better result.
The message format
What we know about the message so far:
Offset         0  1  2  3  4  5  6  7  8  9 10 11 12 13 14 15 16 17 18 19 20 21 22 23 24 25 26 27 28 29 30 31 32 33

02:23 <Buffer ff 1f 0c 01 96 00 fb 00 00 00 00 36 6b 02 08 3b 00 00 00 00 00 00 00 00 00 00 00 80 00 07 00 0f 9b 55>
                         |     |                  |    |   |
                       power   |             cadence   |  resistance
power% speed| Offset | Description | Type |
|---|---|---|
| 3 | Power (watts) | uint16 |
| 5 | Power (percentage of FTP) | uint16 |
| 12 | Cadence (rpm) | uint8 |
| 13 | Speed (km/h × 10) | uint16 |
| 15 | Resistance (percentage) | uint8 |
We already have what we need but we can make some educated guesses about some of the rest of the packet.
The name “Nordic UART Service” hints that this protocol was intended for use on a real UART and if so the first and last few bytes would be for serial frame synchronization and error detection.
| Offset | Description | Type |
|---|---|---|
| 0 | Start of packet marker (?) | uint8 |
| 1 | Length (of bytes to follow, excl. end) (?) | uint8 |
| 2 | Type of payload (?) | uint8 |
| 26 | Active duration (seconds) (confirmed) | uint16 |
| 28 | 16-bit counter (distance?) | uint16 |
| 30 | 16-bit counter (distance?) | uint16 |
| 32 | Checksum (xor of 0 and 1..31 inclusive) (confirmed) | uint8 |
| 33 | End of packet marker (?) | uint8 |
One last small change to our program’s output gives us a really primitive replacement for the Flywheel app’s “free ride” function.
power cadence resistance
  23W   63rpm   0%
  24W   73rpm   0%
  26W   73rpm   0%
  27W   82rpm   0%
  29W   82rpm   0%
  30W   89rpm   0%
  32W   89rpm   0%
  33W   99rpm   0%
  35W  110rpm   0%
  41W  110rpm  15%
  47W  119rpm  15%
  57W  119rpm  20%
  66W  121rpm  19%
  74W  121rpm  24%
  80W  119rpm  23%
  84W  118rpm  24%
 100W  118rpm  32%
 115W  117rpm  35%
 136W  117rpm  40%
 160W  107rpm  41%
 177W  107rpm  41%
Part 2 - Getting data into Zwift
Now that we can get realtime Power and Cadence data from the bike, it’s time to figure out how to communicate with Zwift.
The plan is to pick a bike that Zwift already supports and mimic it. The first step is to download Zwift and have a look over the website.
It turns out Zwift supports a lot of devices. It took some research to decide which one to emulate. We want to pick one that is easy to emulate and widely supported by other apps too.
From the Zwift website supported devices page:
There are many indoor bikes on the market that use proprietary communication channels. Zwift supports indoor bikes that broadcast power (watts) via ANT+ or Bluetooth Smart (BLE) using open standards.
After looking into ANT+ and Bluetooth LE, I decided to go with Bluetooth LE. ANT+ would have required extra hardware for no obvious benefit in this case.
Bluetooth LE Cycling Power Service
The Cycling Power Service is what we need to implement. The spec is available on the official Bluetooth website. It’s very detailed. Here is the relevant summary:
- Cycling Power Service (UUID 0x1818):
- Characteristics:
- Cycling Power Feature (UUID 0x2a65) (Read)
- Cycling Power Measurement (UUID 0x2a63) (Notify)
- Sensor Location (UUID 0x2a5d) (Read)
The Cycling Power Feature and Sensor Location characteristics are constants that tell Zwift what extra features we have (cadence) and where the power measurement is being taken.
The Cycling Power Measurement characteristic is where the realtime data from the Flywheel bike goes. Power can go in as-is. Cadence needs to be provided in a different format. Rather than periodically telling Zwift an instantaneous cadence like “60 rpm” we need to send two values: the total count of crank revolutions (pedal strokes), and the timestamp of the last crank revolution, then Zwift will calculate the rpm itself.
noble, the Bluetooth client library we used earlier to talk to the bike has a companion library, bleno, for writing Bluetooth servers/peripherals, which we’ll use here.
After some trial and error we end up at the following screen:
Sending random power and cadence data to Zwift over Bluetooth.
Part 3 - Putting it all together
We can talk to the bike and we can talk to Zwift. Now all that’s left to do is combine the code from parts 1 and 2 and get live data streaming from the bike directly into Zwift.
The final program:
For the most part this went as planned however I did run into one issue.
Bluetooth LE connection parameters
Shortly into the first test ride on the Raspberry Pi the bike lost its Bluetooth connection. I figured maybe it was some wireless interference but it continued to happen.
Debugging at the application level didn’t reveal any insights or useful error messages so I captured a btsnoop trace with btmon.
The excerpt below shows the disconnection reason. There is a relative timestamp (seconds) on the top-right of log entry.
> HCI Event: Disconnect Complete (0x05) plen 4                                #449 [hci0] 118.546006
        Status: Success (0x00)
        Handle: 64
        Reason: Unacceptable Connection Parameters (0x3b)
Scrolling back, there is about 30 seconds of successful communication:
> ACL Data RX: Handle 64 flags 0x02 dlen 27                                    #384 [hci0] 87.541516
      ATT: Handle Value Notification (0x1b) len 22
        Handle: 0x000b
          Data: ff1f0c0000000000000000000000002200000000
> ACL Data RX: Handle 64 flags 0x02 dlen 21                                    #385 [hci0] 87.543353
      ATT: Handle Value Notification (0x1b) len 16
        Handle: 0x000b
          Data: 0000000000000000000000003155
Then the bike asks to update connection parameters and the system rejects the request. The bike continues to send data for 30 more seconds then gives up and disconnects.
> ACL Data RX: Handle 64 flags 0x02 dlen 16                                    #386 [hci0] 88.440929
      LE L2CAP: Connection Parameter Update Request (0x12) ident 6 len 8
        Min interval: 16
        Max interval: 60
        Slave latency: 0
        Timeout multiplier: 400
< ACL Data TX: Handle 64 flags 0x00 dlen 10                                    #387 [hci0] 88.441103
      LE L2CAP: Connection Parameter Update Response (0x13) ident 6 len 2
        Result: Connection Parameters rejected (0x0001)
The connection parameters are used to control the tradeoff between data throughput and power consumption. The Texas Instruments BLE-Stack docs gives a good breakdown of how each parameter works.
So why is BlueZ rejecting these parameters and can we get it to accept them?
There are some debugfs endpoints that imply it is possible to control the range of acceptable connection parameters:
/sys/kernel/debug/bluetooth/hci0/conn_min_interval
/sys/kernel/debug/bluetooth/hci0/conn_max_interval
/sys/kernel/debug/bluetooth/hci0/conn_latency
/sys/kernel/debug/bluetooth/hci0/supervision_timeout
However I was unable to get them to have any impact. The connections continued to be created with unfavorable parameters and the update requests continued to be rejected.
Next, I tried an option in noble (HCI_CHANNEL_USER) to allow the application to handle these requests directly. This fixed the immediate problem but presented a new problem. HCI_CHANNEL_USER gives noble exclusive access to the Bluetooth adapter and prevents bleno from working. After reading over the noble and bleno code it didn’t seem like there was an easy way to have them co-operate on a single exclusive socket.
After reading over the linux-bluetooth mailing list and some searching, I stumbled upon this GitHub issue where a poster mentioned they had success using hcitool to update the parameters on a connection.
For the Flywheel bike the command used is:
hcitool lecup --handle 64 --min 16 --max 60 --latency 0 --timeout 400
(Note: the min and max are in units of 1.25ms and timeout is in units of 10ms.)
The log below shows the above command successfully updates the connection parameters:
@ RAW Open: hcitool (privileged) version 2.22                                     {0x0006} 81.324864
@ RAW Close: hcitool                                                              {0x0006} 81.328082
@ RAW Open: hcitool (privileged) version 2.22                              {0x0006} [hci0] 81.329693
< HCI Command: LE Connection Update (0x08|0x0013) plen 14                      #388 [hci0] 81.331279
        Handle: 64
        Min connection interval: 20.00 msec (0x0010)
        Max connection interval: 75.00 msec (0x003c)
        Connection latency: 0 (0x0000)
        Supervision timeout: 4000 msec (0x0190)
        Min connection length: 0.625 msec (0x0001)
        Max connection length: 0.625 msec (0x0001)
> HCI Event: Command Status (0x0f) plen 4                                      #389 [hci0] 81.333532
      LE Connection Update (0x08|0x0013) ncmd 1
        Status: Success (0x00)
> HCI Event: LE Meta Event (0x3e) plen 10                                      #392 [hci0] 81.841057
      LE Connection Update Complete (0x03)
        Status: Success (0x00)
        Handle: 64
        Connection interval: 75.00 msec (0x003c)
        Connection latency: 0 (0x0000)
        Supervision timeout: 4000 msec (0x0190)
@ RAW Close: hcitool                                                       {0x0006} [hci0] 81.842147
> ACL Data RX: Handle 64 flags 0x02 dlen 27                                    #393 [hci0] 82.441717
      ATT: Handle Value Notification (0x1b) len 22
        Handle: 0x000b
          Data: ff1f0c0000000000000000000000002100000000
> ACL Data RX: Handle 64 flags 0x02 dlen 21                                    #394 [hci0] 82.591155
      ATT: Handle Value Notification (0x1b) len 16
        Handle: 0x000b
          Data: 0000000000000000000000003255
30 seconds later we’re still connected and receiving data from the bike…
> ACL Data RX: Handle 64 flags 0x02 dlen 27                                   #453 [hci0] 112.441630
      ATT: Handle Value Notification (0x1b) len 22
        Handle: 0x000b
          Data: ff1f0c0000000000000000000000002100000000
> ACL Data RX: Handle 64 flags 0x02 dlen 21                                   #454 [hci0] 112.516077
      ATT: Handle Value Notification (0x1b) len 16
        Handle: 0x000b
          Data: 0000000000000000000000003255
> ACL Data RX: Handle 64 flags 0x02 dlen 27                                   #455 [hci0] 113.416650
      ATT: Handle Value Notification (0x1b) len 22
        Handle: 0x000b
          Data: ff1f0c0000000000000000000000002100000000
> ACL Data RX: Handle 64 flags 0x02 dlen 21                                   #456 [hci0] 113.566099
      ATT: Handle Value Notification (0x1b) len 16
        Handle: 0x000b
          Data: 0000000000000000000000003255
60 seconds later we’re still connected and receiving data from the bike…
> ACL Data RX: Handle 64 flags 0x02 dlen 27                                   #525 [hci0] 148.516576
      ATT: Handle Value Notification (0x1b) len 22
        Handle: 0x000b
          Data: ff1f0c0000000000000000000000002100000000
> ACL Data RX: Handle 64 flags 0x02 dlen 21                                   #526 [hci0] 148.666003
      ATT: Handle Value Notification (0x1b) len 16
        Handle: 0x000b
          Data: 0000000000000000000000003255
Problem solved! Fortunately this was the end of the disconnects.
The dependency on hcitool is not ideal. I’d still like to know what was going on with the debugfs endpoints or how to otherwise influence BlueZ to accept these connection parameters. If you have any ideas let me know.
It is worth noting that the HCI socket interface used by noble and bleno is deprecated by BlueZ in favor of the D-Bus API.
Deploying
The final step is to set this up on the Raspberry Pi Zero W to start on boot and restart on failure. Whenever the Raspberry Pi is plugged-in and within range, we can jump on the bike and start the Zwift app and everything should just work.
First, the node binary needs permission to advertise Bluetooth services:
sudo setcap cap_net_raw+eip /usr/local/bin/node
And the following systemd unit file takes care of starting the application at boot and keeping it running:
[Unit]
Description=Gymnasticon
After=bluetooth.target
Requires=bluetooth.target

[Service]
Type=simple
Environment=
WorkingDirectory=/home/pi
User=pi
Group=pi
ExecStart=/usr/local/bin/gymnasticon
RestartSec=1
Restart=on-failure

[Install]
WantedBy=multi-user.target
The first test ride in action. Note the bike has a convenient USB charging port that can power the Pi.
Zwift working with the Flywheel Home Bike with the help of a Raspberry Pi.
Conclusion
This has been in daily use for over 2,000 miles and works really well.
Zwift is a lot of fun.
TrainerRoad and Rouvy work but I haven’t used them much.
The Raspberry Pi Zero W is very versatile and affordable. It’s great that it can be powered by USB.
The Flywheel Home Bike is a very solid build quality bike. I’m glad to have found a way to reuse it.
Todo
Figure out the Bluetooth messages that need to be sent to calibrate the bike. The first pass at this would be to use the ICG Training App to perform the calibration procedure while using Bluetooth developer tools on the device or a sniffing proxy.Update: This is done! I released a simple calibration and testride tool called “FlyTest” that works on macOS, Windows, Linux, Android and iOS. Try it out here: https://ptx2.net/apps/flytest/Add a motor to the resistance dial and implement the Bluetooth Fitness Machine Service so Zwift can control the resistance.